
ProTip: 3 Easy Steps to Create the Perfect Table for your Form
Many forms require some sort of tabular layout. Creating and formatting tables can be a bit tricky at times, so to help you be successful at this task we have provided these guidelines.
Step-by-step guideline on how to create a table in your form:
Pull up your form:

2. How to Add a New Field / Create a Table
For this step, we create an “Equipment & Tools” table.
First, go to the tool bar on the left of the template builder and simply drag and drop the table from “Add New Field.” Use the “Properties” tool bar, on the right of the template builder, to specify the number of rows and columns for your table. Make sure to adjust the cell’s width and height so that it aligns properly. Please note that our table is only what is highlighted in yellow and is named Table 1:

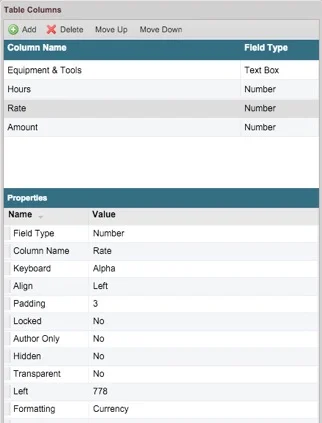
3. Column Formatting
For this step, we set field type and formatting for each column
In this particular table we want to calculate the total amount to charge for each piece of equipment or tool based on how many hours it was used and the rate at which we charge per hour. Before getting to the calculation it is very important that you set the correct field type and formatting for each column in the column editor. In order to pull up the column editor, first click on the table in which you want to edit its’ columns. Next, click on the “Columns” field located in the “Properties Box” to the right of the template editor.

For example, Column 3 named “Rate” will have a “Number” field type and “Currency” formatting.
You are now ready to input auto calculations and totals in your form! If you need help doing so, check out our ProTip on creating calculations and totals.