ProTip: How To Include Maps on Your Mobile Forms
Filling out your forms on a mobile device allows you to utilize native features that are standard on phones and tables.
Among these is the ability for your form to use your device’s GPS capabilities to drop a map or set of GPS coordinates directly on your form. Follow these easy steps to include a map on your next form.
Step 1: Open Your Template in the Editor
First, you will want to login to your GoFormz account and open the mobile Form Template that you want to add a map to.
Step 2: Drag and Drop the Location Field
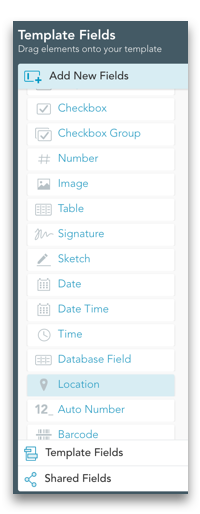
Once you are logged in, locate the Template Fields table to the left of the Template Editor. Scroll through the different fields and find the Location field.
**Note: Location fields can be displayed as a map or set of GPS coordinates.
Now, simply click and drag the field onto your template. Using your mouse and arrow keys place it in its designated spot on your form. To resize, simply click and drag on its edges.
Step 3: Name and Format Field
The last thing you will want to do is to properly name and format your field. You do this using the Field Properties table to the right of the Template Editor.
Some important properties you may want to pay attention to:
Name: Make sure your field has an appropriate name, so that it does not confuse teammates when completing the form in Field View.
Required: This property determines whether this Location field must contain a value for the form to be completed.
Default Value: You can decide to have your form automatically insert a map of the device’s current location when the form is first created or make it so that the map is only inserted once the person filling out the form clicks or taps on the field.
Display: As noted before, Location fields can be either represented as a map or set of GPS coordinates.
Including maps on your forms can help you start collecting new pieces of insightful data for your business. The best part is that it doesn’t take much to set them up on your forms.


