
How to Build Great List View Forms
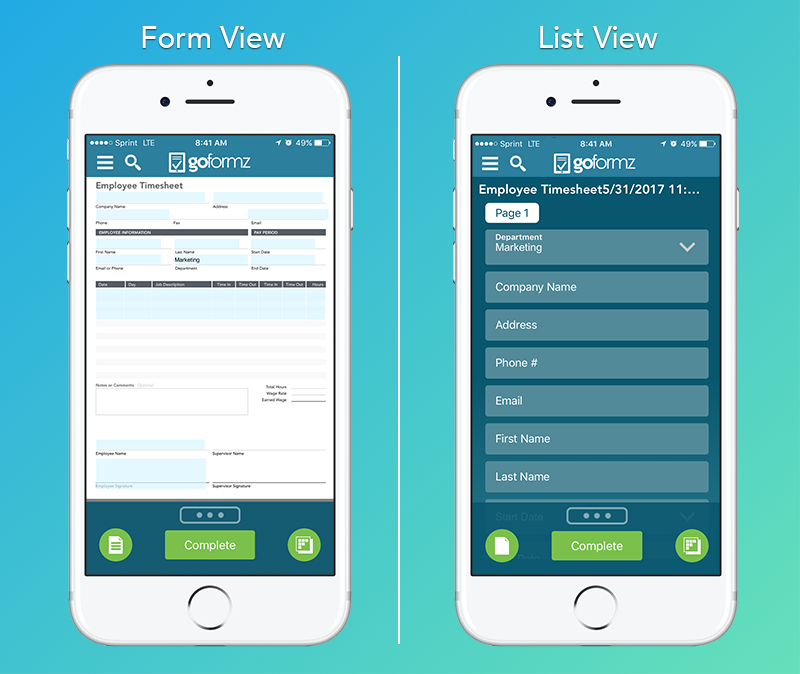
Using List View for entering your form data is the perfect complement to your professional, client-ready Form View.
List View provides a users with a streamlined, organized, intuitive index of the fields included within your Form View — making GoFormz even easier to use on smaller devices, while maintaining the form’s professional formatting.
Ready to create awesome List View forms? Let’s get started.
ProTip: It’s best to craft your List View after developing your form within Form View — This allows you to add and position each field, so you can better understand your user’s form behavior when organizing List View fields.

Step One: Open your template, click the List tab.
Open your Template within the Template Editor on your desktop, and navigate to the List tab, a preview of your List View form will load.
This preview will show a Tab for each of your form pages, listing every field included on that page.
Step Two: Add Tabs and Sections.
To build great List View forms, it’s best to understand the hierarchy of Tabs and Sections. Tabs act as the top-level grouping in your List View, while Sections play a mid-level role.
Take a moment to consider the desired user behavior you’d like to enforce within your forms. Understanding the behavior of your form users will help you to better organize your fields within your List View form.
Tabs
To add a Tab: Click the [Add Tab] button.
To rename a Tab: Select the Value column in the Field Properties section on the right hand side of your Tab, and add your new Tab name.
To reorder a Tab: Simply drag your Tab left or right.
To delete a Tab: After removing each section from the Tab, a link will appear prompting you to Delete. (Remember, you cannot delete Default Tabs resulting from Form View, only Tabs added within List View. These Tabs can, however, be Renamed.)
Sections
Create a Section: Drag the Create Section item from the left hand sidebar.
Rename a Section: Revisit the Field Properties section, and select the Value column next to the Section Title property, and type your new name.
Reorder Sections: Just drag and drop your Section within your Tab.
Move a Section to another Tab: Drag your Section to the appropriate Tab.
Delete a Section: Click on your Section, and hit Delete (Windows) or Fn+Delete (Mac).
Step Three: Manage your fields.
Working with Fields within List View is largely different from working with Fields within Form View. Using List View, you cannot create or delete Fields — this must be done in Form View.
ProTip: To make your field management simpler, be sure to take advantage of multi-select (Shift+Click each field you hope to edit or move).
Reorder Fields within a Section: Drag selected Fields within their original Section.
Move Fields to a new Section: Drag Fields to their new Section.
Move Fields to a new Tab: Drag Fields over the name of their new Tab.
